
TAO 是Nvidia 所開發的工具,目的是讓AI項目更快落地,使用TAO 這套軟體可以不用寫任何程式碼,僅僅只是準備數據集並且調調參數即可以使用,TAO的前身稱為TLT(transfer learning tool),而TAO是經由TLT演化而來,顧名思義就是nvidia 在server 上提供大型訓練集所訓練出來的網路,這些網路權重都是經由很高級的GPU訓練好幾天得到的,而經由transfer learning就可以使用這些預訓練網路(pretrained network)快速的訓練出更高精度的網路,這步驟確實是需要的,筆者曾經比較過用獨立從頭到尾訓練的網路(train from scratch)與這些有使用預訓練的網路(pretrained weight),後者的準確度就是比較高,也因此現今開發深度學習模型都需要這些大公司已經訓練好的權重,而使用TAO這套工具可以快速的獲取並訓練,最重要的是這工具支持剪枝網路與部屬在嵌入式裝置的功能
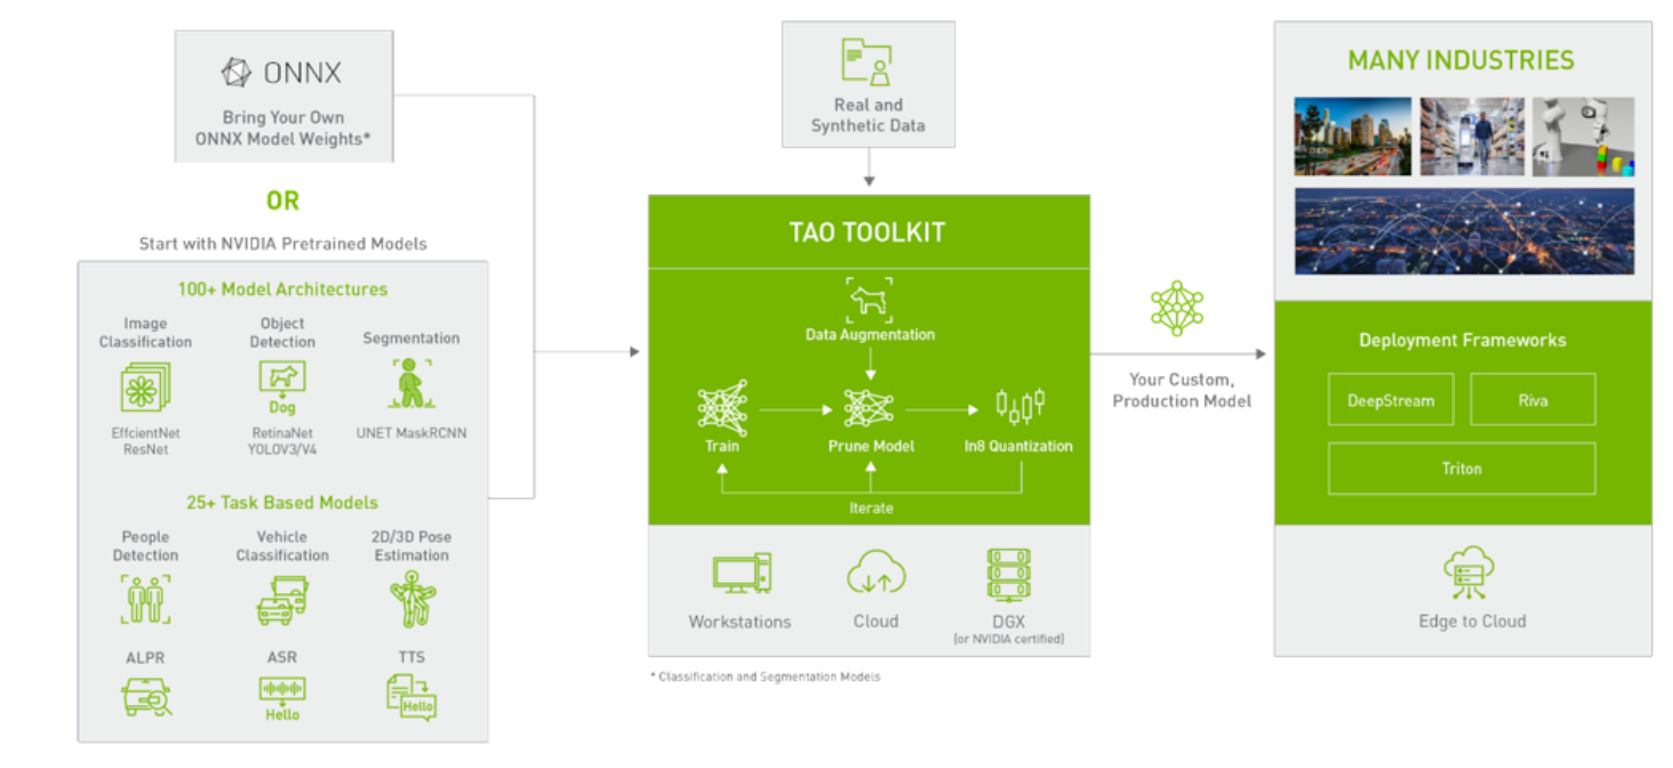
下圖即是TAO的使用架構圖,使用方式有兩種,一種是用自建的模型-把網路轉成onnx模式並整合進tao做使用,另一種是TAO內建的各種模型,總共分為兩大類,一為影像處理另一種為語音處理,TAO把這些模型分別都整合到Docker Image中,使用者可以藉由docker 快速的佈署深度學習的環境,再也不用為了各種不同的python安裝包互相衝突解Bug而煩惱了
另外小編在使用的時候一直對流程很不理解,官網說明可以建立一個虛擬環境安裝使用TAO,但又說可以使用docker來使用,對當初還未使用的我來說這兩個可以說是擇一即可,因為docker所建立出的container本身就是一個隔離的虛擬環境了,為何又需要建立另一個虛擬環境呢? 經由實際測試過後才了解nvidia官方所說的安裝虛擬環境僅僅只是為了隔離安裝nvidia-tao、..等工具而已,而在這個虛擬環境中運行tao的相關指令,程式就自動會到網路上抓取需要的Image下來,所有的train、prune..等相關的指令都是在container中所進行的,所以關係就像是在本機端安裝一個虛擬環境,而在這個虛擬環境執行tao相關指令後又會開啟另一個虛擬環境運行,所以執行這套TAO工具總共需要兩個虛擬環境執行
若有需求要使用TAO的讀者,下面是小編所布置的完整流程,有不懂的地方可以留言給我,小編會盡力回答大家
step1:安裝anaconda
首先安裝虛擬環境,若要按照官網建立虛擬的環境也是可以,而我之前已經使用anaconda 習慣了,因此就沿用anaconda。首先到官網下載Linux 版本的anaconda
到terminal執行以下指令安裝
./Anaconda3-2022.05-Linux-x86_64.sh
建立新的虛擬環境,env_name 填您想使用的環境名稱
conda create -n env_name
啟動新的虛擬環境
conda acitvate env_name
若執行正確會看到前面有個括號,代表現在已經進入虛擬環境內了

step2:安裝tao 環境
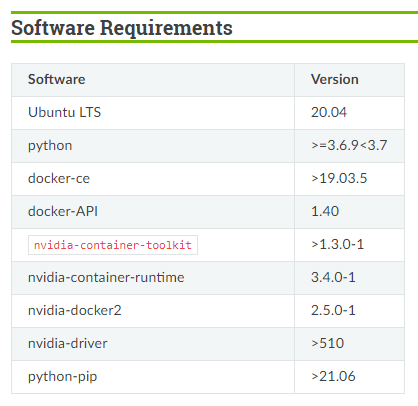
底下是官網所提供的安裝TAO 軟體的最低要求,nvidia-driver 要求為大於510版本,docker 版本要求大於19.03,ubuntu要求為20.04
依序在虛擬環境中安裝官網所要求的安裝包
pip3 install nvidia-tao
pip3 install nvidia-pyindex
pip3 install jupyter
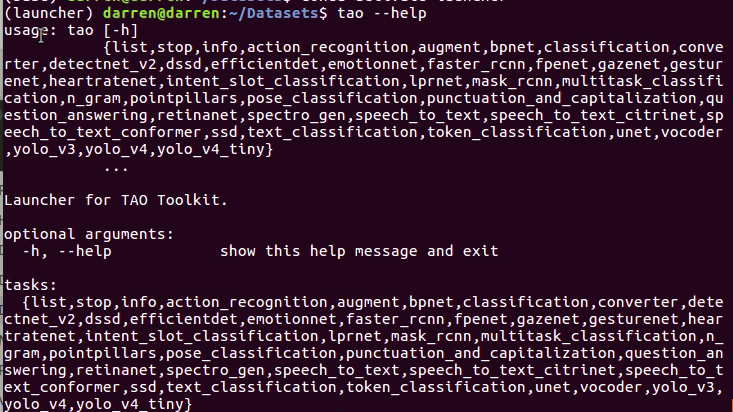
tao –help
若出現以下畫面代表成功安裝
step3:安裝顯卡驅動
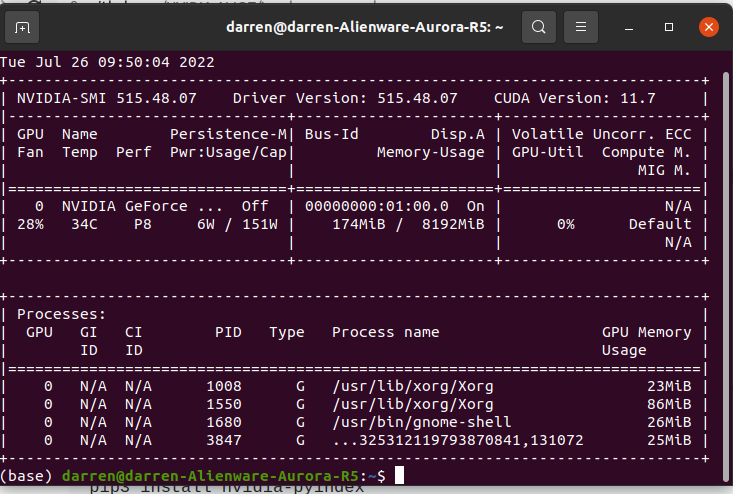
根據上述規格,使用此套軟體的顯卡驅動要求為大於510版本,打開terminal 並且打上nvidia-smi確認,若大於510版本則可以跳過此步驟
首先更新ppa資源
sudo add-apt-repository ppa:graphics-drivers
sudo apt-get update
sudo apt upgrade
列出可以安裝的版本
sudo ubuntu-drivers devices
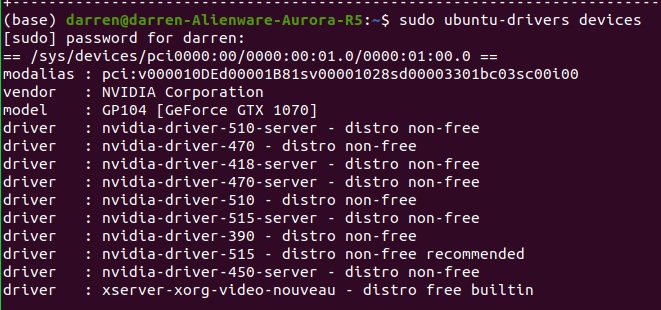
若recommend 恰好為所需版本則可以執行autoinstall
sudo ubuntu-drivers autoinstall
若要指定版本安裝
sudo apt install nvidia-driver-XXX
之後重新開機若出現以下畫面及成功
step4:安裝docker
安裝nvidia-docker 只要照著官網的步驟走很快就可以完成了,首先要注意官網支持的linux版本,小編是安裝最新的Ubuntu20.04 Long term support(LTS)版本

#step1
sudo apt-get install curl
#step2
curl https://get.docker.com | sh \
&& sudo systemctl --now enable docker
#step3
distribution=$(. /etc/os-release;echo $ID$VERSION_ID) \
&& curl -s -L https://nvidia.github.io/nvidia-docker/gpgkey | sudo apt-key add - \
&& curl -s -L https://nvidia.github.io/nvidia-docker/$distribution/nvidia-docker.list | sudo tee /etc/apt/sources.list.d/nvidia-docker.list
#step4
curl -s -L https://nvidia.github.io/nvidia-container-runtime/experimental/$distribution/nvidia-container-runtime.list | sudo tee /etc/apt/sources.list.d/nvidia-container-runtime.list
#step5
sudo apt-get update
#step6
sudo apt-get install -y nvidia-docker2
#step7
sudo systemctl restart docker
#step8
sudo docker run --rm --gpus all nvidia/cuda:11.0-base nvidia-smi
如果最後有跑出如下畫面就代表成功安裝了

- 讓使用docker 不用sudo 使用的時候常會出現permision denied,原因是因為沒有對現在的使用者加入權限功能,若不想每次都sudo並打密碼的話可以打如下指令,把現在的使用者加進docker中
sudo groupadd docker
sudo usermod -aG docker $USER
安裝完畢後重新開機讓新設定啟用
step5:安裝ngc 與API key
NGC是nvidia 的抓取網路訓練參數套件(pretrained weights),安裝好此套件透過簡單的下指令方式就可以把網路下載下來進行transfer learning 的動作,而API key 是使用TAO這款軟體所需的license key,使用者每使用一次TAO指令都需要給予–key 參數,而這參數後面所輸入的正是註冊nvidia帳戶所產生的API key
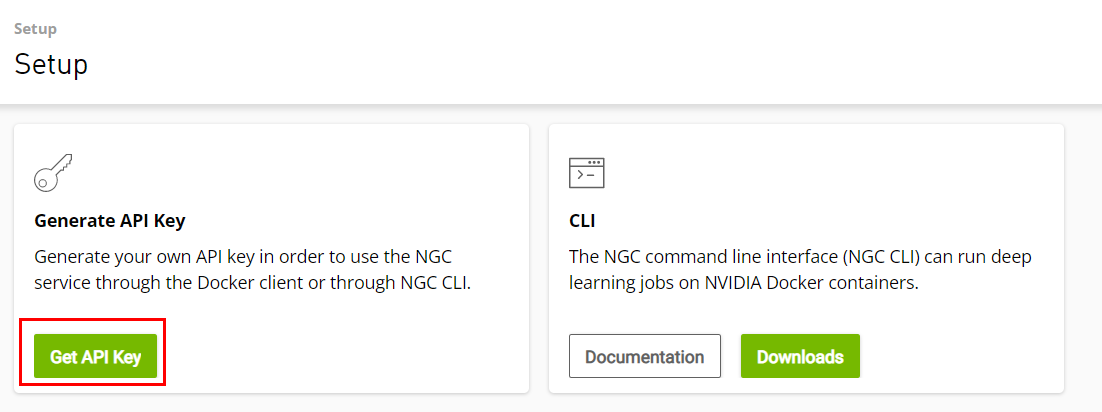
a.獲取API key
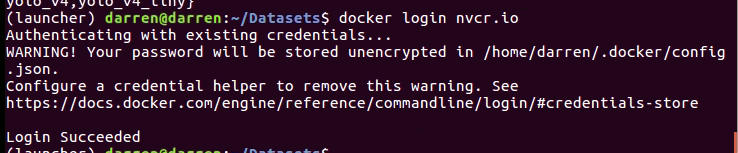
首先到ngc官網,註冊一個帳號後點選右上角的setup按鍵,進入如以下畫面,點選左下角之創造API key鍵功能,然後在terminal中登入docker,使用者名稱輸入$oauthtoken,密碼則輸入官網提供給您的API KEY,若出現Succeeded則代表登入成功,此步驟只要執行一次即可,往後都不需要再重複執行

sudo docker login nvcr.io
b.安裝ngc
下載 ngc linux執行原始碼
wget -O ngccli_linux.zip https://ngc.nvidia.com/downloads/ngccli_linux.zip && unzip -o ngccli_linux.zip && chmod u+x ngc
將ngc執行檔位置加入環境變數
echo "export PATH="$PATH:$(pwd)"" >> ~/.bash_profile && source ~/.bash_profile
設定ngc,輸入剛剛獲取的API key,之後一路按下Eneter鍵
ngc config set

step6:下載sample並運行 classification範例
官方把範例都打包成了一個一個了ipython notebook檔案,每個範例都很清楚的說明,挑選想要的程式範例進行運行即可,底下挑選的範例是classification 範例程式進行說明,官網上也有很詳細的文件說明參數定義
下載官網範例
wget –content-disposition https://api.ngc.nvidia.com/v2/resources/nvidia/tao/cv_samples/versions/v1.4.0/zip -O cv_samples_v1.4.0.zip
解壓縮安裝包
unzip -u cv_samples_v1.4.0.zip -d ./cv_samples_v1.4.0 && rm -rf cv_samples_v1.4.0.zip && cd ./cv_samples_v1.4.0
進入到samples資料夾
cd cv_samples_v1.4.0
打開ipython notebook
jupyter notebook
打開notebooks/classification/tao_voc/classification.ipynb,把KEY改成上述的API key,LOCAL_PROJECT_DIR 改成想要的實驗位置,把資料集放入LOCAL_PROJECT_DIR/data 資料夾中,其他的路徑都是不用改動的

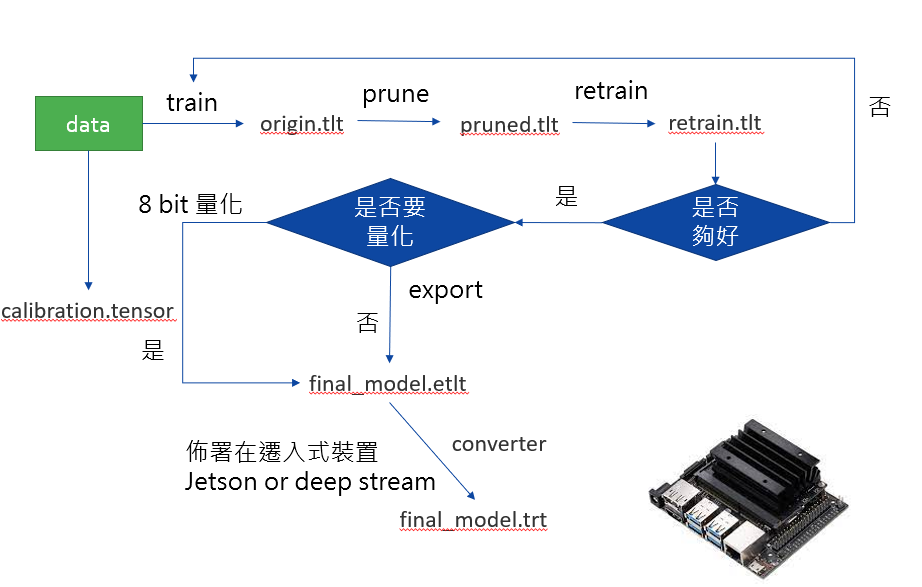
a.train
經過運行之後就會在 result directory 資料夾下發現輸出的權重,encoding key 放的就是剛剛所產生的API key /home/darren/code_project/tao_classification/classification/output/weights/resnet_001.tlt
tao classification train [-h] -e <spec file>
                              -k <encoding key>
                              -r <result directory>
                              [--gpus <num GPUs>]
                              [--num_processes <number_of_processes>]
                              [--gpu_index <gpu_index>]
                              [--use_amp]
                              [--log_file <log_file_path>]
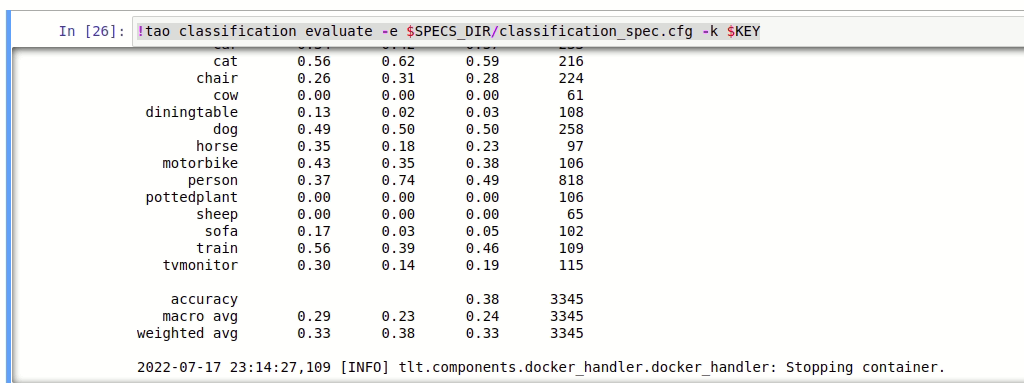
b.evaluate
tao classification evaluate [-h] -e <experiment_spec_file>
                                 -k <key>
                                 [--gpu_index <gpu_index>]
                                 [--log_file <log_file>]
c.prune
model 輸入剛剛訓練出來的模型位置,output file 設置想要輸出prune model的位置,我輸出的文件位置如下 /home/darren/code_project/tao_classification/classification/output/resnet_pruned/resnet18_nopool_bn_pruned.tlt
tao classification prune [-h] -m <model>
                              -o <output_file>
                              -k <key>
                              [-n <normalizer>
                              [-eq <equalization_criterion>]
                              [-pg <pruning_granularity>]
                              [-pth <pruning threshold>]
                              [-nf <min_num_filters>]
                              [-el <excluded_list>]
                              [--gpu_index <gpu_index>]
                              [--log_file <log_file>]
                              [-bm <byom model path>]
d.retrain
之後一樣使用train指令對prune的模型進行重新訓練的動作,只是spec檔案換成了retrain 的檔案參數classification_retrain_spec.cfg
e.evaluate
使用指令evaluate 可以對訓練出來的模型做驗證的工作,最後的結果會輸出至person的檔案夾中 /home/darren/code_project/tao_classification/data/split/test/person/result.csv
tao classification evaluate [-h] -e <experiment_spec_file>
                                 -k <key>
                                 [--gpu_index <gpu_index>]
                                 [--log_file <log_file>]
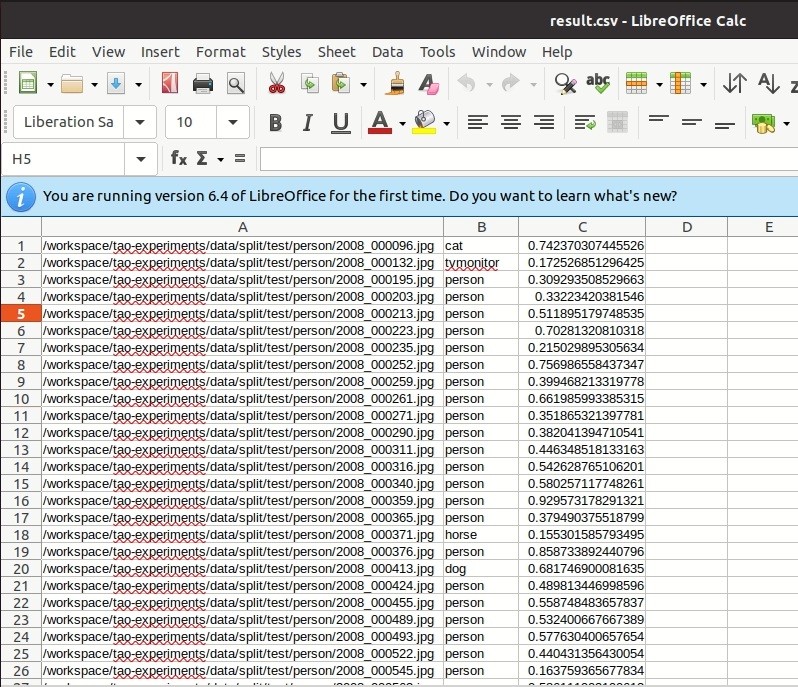 /home/darren/code_project/tao_classification/data/split/test/person/result.csv
f.export
將訓練完的模型經由export指令輸出成etlt檔案 /home/darren/code_project/tao_classification/classification/export/final_model.etlt
tao classification export [-h] -m <path to the .tlt model file generated by training>
                               -k <key>
                               [-o <path to output file>]
                               [--cal_data_file <path to tensor file>]
                               [--cal_cache_file <path to output calibration file>]
                               [--data_type <data type for the TensorRT backend during export>]
                               [--batches <number of batches to calibrate over>]
                               [--max_batch_size <maximum trt batch size>]
                               [--max_workspace_size <maximum workspace size]
                               [--batch_size <batch size for calibration data>]
                               [--strict_type_constraints <Flag to apply strict type constraints>]
                               [--gen_ds_config] <Flag to generate ds config and label file>]
                               [--engine_file <path to the TensorRT engine file>]
                               [--verbose]
                               [--force_ptq]
                               [--gpu_index <gpu_index>]
                               [--log_file <log_file_path>]
                               [--classmap_json CLASSMAP_JSON]
                               [-e <experiment_spec_file>]
                               [--is_byom]
g.calibration
如果要quantization的話可以選擇calibration_tensorfile指令,產生的檔案如下 /home/darren/code_project/tao_classification/classification/export/calibration.tensor
tao classification calibration_tensorfile -e <experiment_spec_file>
                                          -o <output_tensorfile>
                                          [-m <num_batches>]
                                          [--use_validation_set]
                                          [-v]
h.converter
最後將輸出的模型檔案經由converter指令輸出成trt檔案即可放置嵌入式裝置運行
tao-converter [-h] -k <encryption_key>
                  -d <input_dimensions>
                  -o <comma separated output nodes>
                  [-c <path to calibration cache file>]
                  [-e <path to output engine>]
                  [-b <calibration batch size>]
                  [-m <maximum batch size of the TRT engine>]
                  [-t <engine datatype>]
                  [-w <maximum workspace size of the TRT Engine>]
                  [-i <input dimension ordering>]
                  [-p <optimization_profiles>]
                  [-s]
                  [-u <DLA_core>]
                  input_file

謝謝小編整理這麼棒的文章